m 1 revision imported |
mNo edit summary |
||
| Line 126: | Line 126: | ||
=== Ninth Iteration (Ark Ship) === | === Ninth Iteration (Ark Ship) === | ||
* Decorative Shield - Chest on the lower part of the centre table. | * Decorative Shield - Chest on the lower part of the centre table. | ||
[[Category:MC: Locations]] | [[Category:MC: Locations]][[Category:MC: Dungeons]] | ||
Revision as of 15:43, 28 July 2022
Rania's Fun House is an optional non-repeatable dungeon available later in the game. To unlock this dungeon the Cutie Knights must have gone to and escaped from the Exile Dimension in the Pleasure Palace.
The dungeon is named for its creator, Rania, a crazed mage wielding a magic mirror who was also responsible for the mirror in the Pleasure Palace that took the Cutie Knights to the Exile Dimension in the first place. The entire purpose of this whole thing is purely for her amusement, thus the name of "Fun House".
Warnings
Before tackling the dungeon it is recommended to get some Instant Death protection as it will be useful again the final boss. For now that is the Bunny Print Panties from Marianne's Office in the Administration Building, and the Gothic Corset from the Exile Dimension which you hopefully picked up while there. For similar reasons, several revival items and some healing items would not be out of place either.
The major warning though is a mechanic that happens at the beginning of this dungeon that can only be undone at the end, necessitating defeating the final boss which many find quite difficult. When you first encounter Rania within this dungeon, she will use her powers over space and time to retroactively rename all the members of the Cutie Knights to rather crass and derogatory new names. These names will apply not just to the current save file, but all your save files, and all new save files. For reference, the names are: Eric/Erica becomes "Sissyboy"/"Cockbreath", Natalie becomes "Tittyrella", Veronica becomes "Cuntina", and Alice becomes "Bob".
Layout
Rania's Fun House consists of a series of nine maps that are iterations of roughly the same layout with a different theme. A large central room, a room each on the east and west side, and two rooms on the north next to each other. Moving between iterations is done through the use of mirrors. Gaining access to the mirror required to proceed usually involves a puzzle, and some iterations have mechanics capable of causing changes in each other. At the end is a tenth map where Rania will be waiting.
First Iteration (Ruined House)
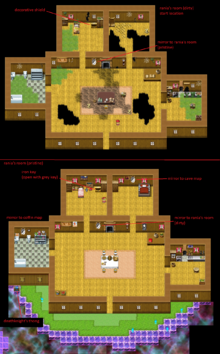
A ruined house. Just interact with the mirror in the central room to move on.
Second Iteration (Pristine House)
The same house, but now in a pristine state. Open the blue chest in the centre to speak with Rania, who will now apply the cursed names mentioned previously in the warning section.
This is the only iteration where can exit through the south. Go down there and despite the prompt asking if you wish to return to camp, if you select "Yes", instead of actually leading back to the camp there is actually an exterior section to the house. On the left you can find a chest with the Deathknight's Thong.
There are two mirrors on this map (excluding the one you came out of that leads back). The mirror in the top right room leads to the 3rd Iteration (Cave). The mirror in the bathroom in the west leads to the 4th Iteration (Tomb).
Third Iteration (Cave) and Fourth Iteration (Tomb)
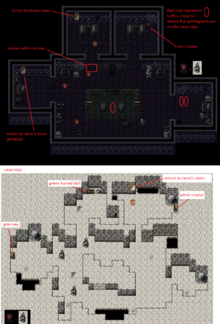
Firstly, there is optional content in the Cave map, otherwise to proceed you would actually want to move to the Tomb map. On the cave map are three magic circles, and approaching them will start a battle against Gazo Naz Tur Rok. Fighting this enemy is completely optional, and while the battle with it while not necessarily difficult, is extremely tedious. Defeating it will cause an Interdimensional Fragment to appear on the map as a sparkle which can be picked up, and this can be done up to three times. There is no current use for them, but one will likely appear in the future. If you are finished with fighting Gazo, or have no desire to and just wish to continue, then head over to the Tomb map.
Over in the Tomb map there is a brief event over in the bottom right corner where you can find a passed out woman named Valarie. After a brief exchange, Isabelle offers to find her a place to stay on the underside of the Pocket Dimension.
Now, the primary puzzle here is the coffins. There are three coffins on the map, and they can be pushed and pulled around the room. Moving these coffins will move a corresponding stalagmite on the Cave map. Moving the coffins and therefore the stalagmites over the magic circles will prevent Gazo Naz Tur Rok from appearing, allowing you to proceed. Consult the images on this page or move between the maps as necessary to get it right.
Back in the Cave map go over to the western room to bump into Rania again. Using Natalie and Veronica as templates, she will create Succubus Veronica who briefly speaks with you before disappearing. You will encounter her again later. Open the chest behind where Rania was to get the Grey Key.
With the Grey Key in hand, it is time do a bit of backtracking. Head back to the Pristine House and the Grey Key is able to unlock the chest in the top left room to get the Iron Key. Use the mirror in the central room to return to the original Ruined House. After getting the Iron Key, the locked chest in the top left room here is now openable (without the use of a key). Get the first Decorative Shield here.
Head all the way back now to the Tomb map, and the Iron Key can be used to open the door to the top left room, with a a mirror leading to the 5th Iteration (Forest).
Fifth Iteration (Forest), Sixth Iteration (Sakura), and Seventh Iteration (Beach)
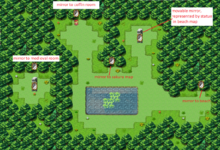
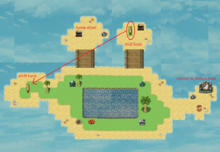
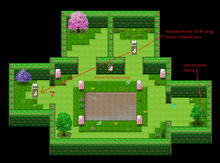
The 5th iteration, the Forest map, is actually not terribly interesting in and of itself. There are two mirrors here, one in the centre that leads to the 6th Iteration (Sakura), and a mirror in the east leading to the 7th Iteration (Beach). You will actually walk past the centre mirror and proceed directly to the beach map first.
On the Beach map head to the top right island where you will encounter Succubus Veronica again, initiating a midboss fight against her. The fight should not be difficult, and you will end up killing her. The golden statue here can be pushed around, and corresponds to a movable mirror on the Sakura map. Push it until it is located on the west part of the island.
Once you are done moving the statue head to the Sakura map, moving through the Forest map. A hidden chest is here in the eastern room, barely visible behind a tree. It contains the Icon of Pride.
Now move to the west side of the map where the movable mirror has been shifted via the statue and use the mirror to travel back to the Forest map. This will put you in the sectioned off western section which was not directly accessible, and where a blocked off mirror is.
Use that mirror to get to the 8th Iteration (Medieval).
Eighth Iteration (Medieval) and Ninth Iteration (Ark Ship)
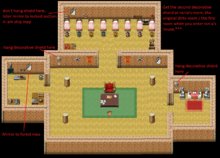
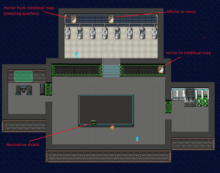
In the medieval map, use the mirror on the right wall outside the sleeping quarters to immediately go to the Ark Ship map. Open the box on the southern end of the centre table to get the second Decorative Shield. Once done, move back to the Medieval map.
The puzzle here is fairly simple. There is another mirror here on this map that will teleport around to three sparkling points on the map each time you interact with it. On these points you can also hang up a Decorative Shield, which will prevent the mirror from teleporting to that spot. Shift the moving mirror into the sleeping quarters, and then put up shields on the left wall outside the sleeping quarters in the centre room, and in the eastern room.
Use the now still mirror to head back to the Ark Ship, putting you in the sealed northern portion of the map. The other mirror here will take you to the final 10th map where the Rania boss fight awaits.
Aftermath
After defeating Rania the Cutie Knights will be returned to the original 1st Iteration, the Ruined House map. All further iterations of this map are now locked out, making this dungeon non-repeatable in the same playthrough. It is HIGHLY RECOMMENDED to save here now, and in fact make a separate additional save here as well.
There is now another mirror on the right side of the centre room. Interacting with it will reveal there is a copy of Eric(a) trapped inside it. The mirror copy will offer to use its powers to help deal with what Rania did to your names. You have three options here: restore true names, rewrite new names, or decline. If you choose to decline you will gain the Black Gem, though it is only a consumable item, and would leave you being called Cockbreath.
If you choose to revert everybody's names to how they originally were it should fix all your save files as well. However, this leaves you susceptible to it happening again if you ever come to this dungeon on a future playthrough.
Choosing to change everybody's names will do the same as the original curse, changing all your other files as well. This will also however be something Rania is capable of recognizing, and she will not change your name again in the future if you come to this dungeon in another playthrough, as she is amused enough thinking that it was her who had already messed with your names. Note that if you choose this option everyone's names must be changed, and Natalie, Veronica, and Alice cannot be named those original names again. Eric(a) however can be named Eric(a) again, or whatever custom names you chose at the beginning of the game. (They also all cannot be named for their cursed Rania-given names, though I'm not sure why you would want to anyways).
There is a strategy to get both the names you want as well as the Black Gem. First make an additional save file. Go to that save file and talk to the mirror to adjust the names as you want on that file, which will affect your main file as well. Back on your main file, now that your names are fixed, you can tell the mirror Eric(a) not to do anything, and receive the Black Gem as well.
It is recommended to always keep an additional save file here at this spot before interacting with the mirror so that you can use it to rewrite your names as you please in the future, since it will affect all files.
Enemies
- Gazo Naz Tur Rok
- Boss enemy. Not a magico. Uses "otherworldly" attacks and has extremely powerful defences.
- Winning does not allow proceeding, but breaks shards from its hide which can be collect (at most three).
- Rania's Cultist
- May be randomly transformed into 1 of 10 possible creatures, among them several enemies unique to this dungeon:
- Succubus Veronica
- Miniboss. Not a magico. A fusion of Natalie and Veronica with a mixture of skills and traits from both.
- Winning provides the Costume Wings.
- Rania (Boss Battle)
- Boss enemy. Not a magico. Uses extremely powerful magic and can heal.
- Has Blue Eye and Red Eye Watchers as support. Taking both out enrages Rania and makes her more deadly.
- Winning provides the Mirror Shard and Rania's Enchanted Ring.
Treasure
First Iteration (Ruined House)
- Decorative Shield - Locked chest in the northwest room. Requires opening the corresponding chest in the Second iteration (Pristine House) to unlock it.
Second Iteration (Pristine House)
- Deathknight's Thong - Chest out on the west side of the south exterior of the house.
- Iron Key - Locked chest in the northwest room. Requires the Grey Key to open.
Third Iteration (Cave)
- Green-Haired Doll - Chest in the northwest room.
- Grey Key - Chest behind Rania in the west room.
- Interdimensional Fragment x3 - Sparkles spread on the floor around the map, with one appearing after each defeat of Gazo Naz Tur Rok, up to three in total.
- White Crystal - Chest in the northeast room.
Fourth Iteration (Tomb)
- Killer's Choker - Chest in the northeast room.
- Purple Crystal - Left chest in the center area.
- Seal of Purity - Right chest in the center area.
Sixth Iteration (Sakura)
- Icon of Pride - Chest hidden behind a tree in the east room.
Seventh Iteration (Beach)
- Lume Elixir - Chest on the northwest island.
- Seal of Focus - Chest on the northeast island.
Ninth Iteration (Ark Ship)
- Decorative Shield - Chest on the lower part of the centre table.
