The Mermaid Caves are an optional mid-game dungeon accessible only after defeating four magicos.
Unlike most game locations, they can only be visited once. To reach them, speak with the Confused Magical Girl standing by the lake at Magical Camp. If you've defeated enough magicos, she will direct you to the Hidden Beach and the Mermaid Caves below.
While escaping from battle here functions as normal, be aware that losing a normal enemy encounter here has serious results, locking off the dungeon permanently and granting you a single rank of the Penis Reduction Transformation. Losing to the final boss is even worse, adding a permanent -5 MDF as well.
Preparation
Although confusing, the Mermaid Caves are one of the safer dungeons in the game: the enemies here move slowly and predictably, making them easy to avoid, and few enemies here pose a serious threat to any team that's progressed far enough to reach them. However, everything here is resistant to fire damage, making combat particularly difficult for Natalie. If you've already found The Discipliner, have her wield that instead of her fire-based weapons. Giving her an arcano core that grants non-fire magic attacks is also recommended.
Layout
Immediately upon arrival, the Cutie Knights are transformed into mermaids and captured as slaves by the mermaid princess. However, a bargain is struck: if the team can defeat the magico which has been terrorizing the mermaids, they will be set free. And so, the party is sent out to explore the labyrinthine caverns that make up this zone.
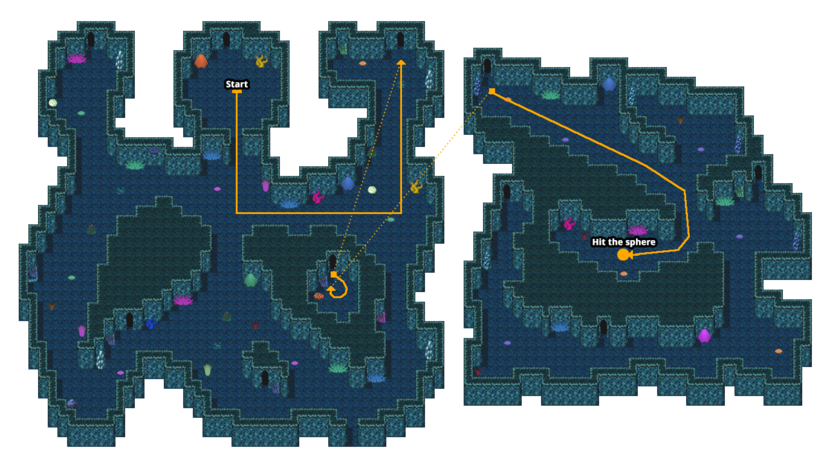
The Mermaid Caves are split into multiple sections, linked by magically enchanted passageways whose destinations vary based on the colour of a wardstone. To navigate and complete this dungeon, your first destination must be to reach the wardstone. From the starting chamber, go down, then right, then up. Enter the warded passageway there, leading to a small chamber with a treasure chest. Grab that, then enter the door you just came out of to be sent to a new area entirely. Head to the right and down from here, and soon you'll see the wardstone to your left. Examine it to change its colour from red to yellow, adjusting the destinations of the warded passageways.

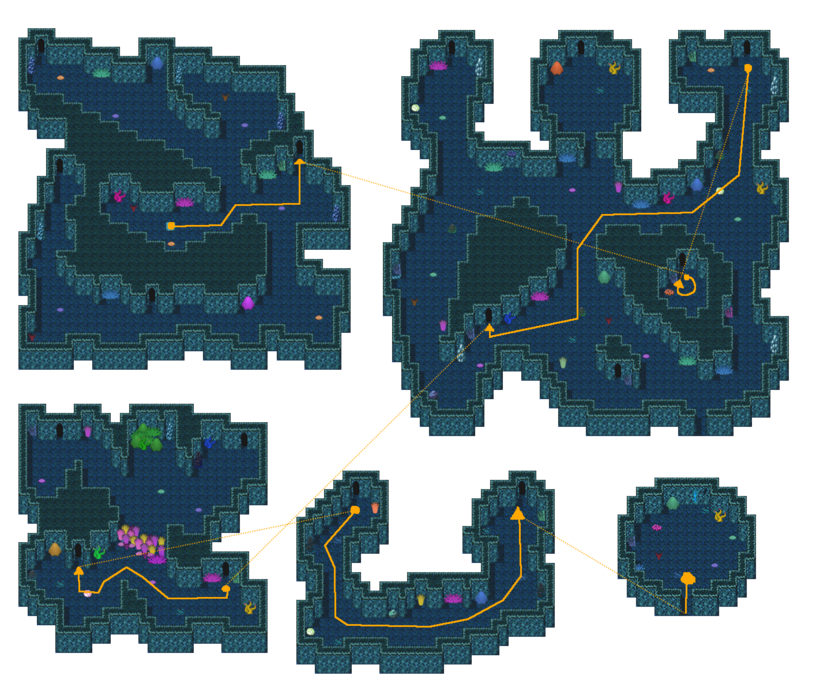
Head to the right and enter the warded passageway you find there. This will again take you to the small chamber. Enter the same door once more and you'll find yourself back in the area you started at. Travel across the map all the way to the bottom left corner and enter the passageway there. Follow this linear path through the un-warded doors you come across to encounter the dungeon's miniboss, the Sea Witch. Defeat her to acquire the Sea Witch's Gemstone.

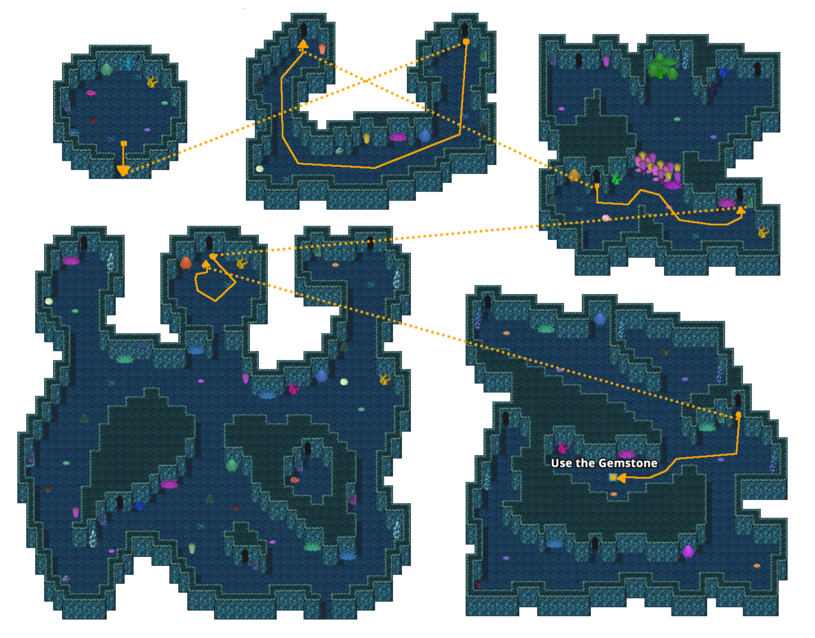
At this point you finally have the key you need to reach the magico. Go back to the wardstone by following the path out, going through the upper right ward, then going right. Use the Sea Witch's Gemstone on the wardstone to change its colour to blue, recalibrating the wards' locations again.

You can now reach Mindstinger's lair, but first you'll want to go pick up the Malevolent Flame, an excellent accessory for Natalie. Head back to where you fought the Sea Witch using the ward on the top left room relative to where the gemstone is and you'll find that the boss room now sends you to a room with a single treasure chest. Since you can never return to this dungeon after defeating the magico, make sure to do so immediately.
Finally, it's time to tackle the dungeon's boss. Return to the large area you first started in, and go the small chamber in the middle of the topmost wall. There will now be an un-warded doorway there. Pass through it to face Mindstinger and end the Mermaid Caves (one way or another).
Enemies
Since the entire dungeon is underwater, all combatants in it are immune to wind skills.
- Deep One
- Jellyfish Mermaid
- Mutant Eel
- Mutant Jellyfish
- Sea Witch
- Midboss. Not a magico. Uses various elemental magic and can cause amnesia, making the party randomly unable to use certain skills.
- Losing results in the Amnesiac Mermaid Game Over.
- Winning provides the Sea Witch's Gemstone. Also the Sea Witch, later revealed to be named Allura, becomes a merchant at the camp.
- Mindstinger
- Magico boss. Uses mental skills and elemental magic. Can charm party members.
- Losing results in a -5 penalty to MDF.
- Winning provides the Water Core.
Treasure
Wardstone-less Map
- Seal of Purity - Chest just south of centre.
- White Crystal - Chest in the northeast corner.
- White Crystal - Chest in the northwest corner.
Wardstone Map
- Infernal Elixir - Chest to the left of the wardstone.
- Purple Crystal - Chest in the southeast corner.
- White Crystal x2 - Chest in the northern section.
Other Maps
- Infernal Elixir - Chest on the path to the Sea Witch.
- Malevolent Flame - Found at the end of the path from the upper left ward in the wardstone area after using the Sea Witch's Gemstone on the wardstone.
